Wednesday, December 12, 2018

How To Add Countdown Timer On Instagram Stories

Which means that on the sticker feature you will be able to set the end date and time for an event or can even make it “all day”. So, in short, this feature will be really helpful to celebrities or for business profiles if they have a new product launch. Now, apart from them, for the general users, it depends on who you are and what you do. So, if you are feeling excited about this new feature but are baffled at the same time on how to use it. Then don’t worry we have got you covered as here is a complete guide on how to add countdown timer on Instagram stories.
How To Add Countdown Timer On Instagram Stories


Install and open the Instagram application.


Now, go to your story option from the home page or by tapping your profile picture.


Once your story option is opened, either click a photo or choose something from the gallery (this will be the background of your countdown so choose something related to that for creating more buzz).


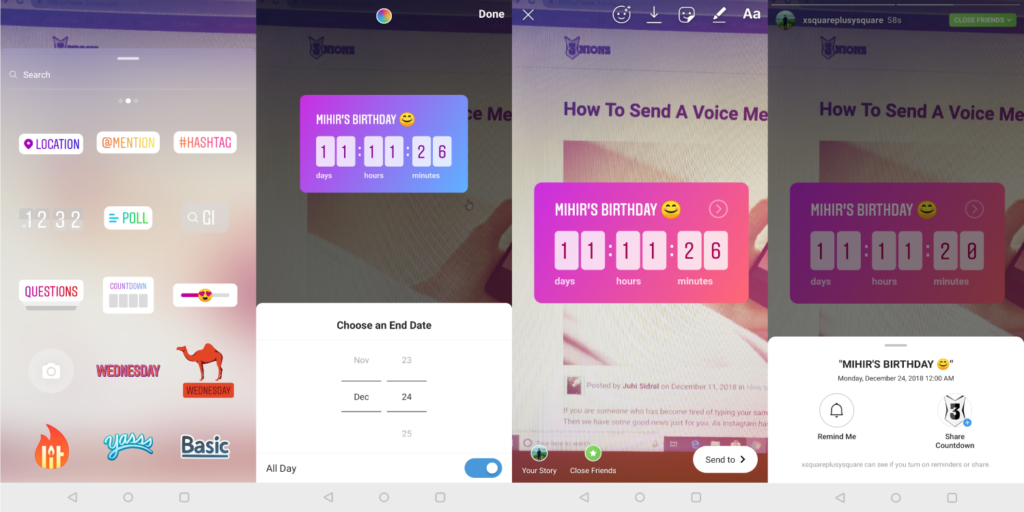
Now, once you are content with your image, tap on the sticker emoji from the upper side of your screen and then you will see a new update on it which says “Countdown”. So, for making a countdown on Instagram simply tap on that sticker. (If you can’t find this feature try updating your application first).


Now, once you tapped on the Countdown sticker you will get an option saying “Create Countdown” so tap on it. Next, the countdown clock will appear on your screen. Here you can set the end date and time, but before that tap on the “Countdown Name” and write the name for your event or the reason for making the countdown.


Once the name is set, here comes a little tricky part but I am sure you will manage. Tap on “Set end date and time” and you will get a small calendar at the bottom of your screen. Now you can select the month and day for which you want your countdown to get set. For instance if you scroll to November your countdown will get set for 11 months (next year of November) with the fixuated time of 12 hours. But if you stay in December (which is the current month) the time won’t be fixed for 12 hours, it will change as per you set the date.


Now, if you want to set a more precise time, at the bottom you will find an option which reads “All Day” and besides that will be a toggle, so tap on that. Next, you will find a calendar that shows the month as well as the date with the timing option too. So, set a month, date and time with the accurate precision of “am” and ‘pm” (as you don’t want to get mix up with those).


Now, when everything is set that’s it you will be done! Also important, if you don’t like the color of your countdown sticker then tap on the color wheel which will be above your sticker and choose from various gradient color options.

So, here are the steps through which one can use the countdown feature on Instagram without any hassle. Now, as we all know, stories on Instagram disappears after 24 hours but this sticker will stay until and unless your countdown ends. And in addition, even your friends and followers will be able to turn on their reminders and can share your countdown timer on their stories as well.

Sponsor ads:

Gihosoft Free iPhone Data Recovery:https://www.gihosoft.com/iphone-data-recovery-free.html

Gihosoft iPhone Data Recovery Free

Free iPhone Data Recovery Software for Windows/Mac

Recover up to 12+ types of files, including contacts, SMS, photos, WhatsApp, Viber, notes, etc.

Restore lost data from iOS devices directly or from iTunes and iCloud backup

Recover iPhone data lost due to iOS upgrade/jailbreak, accidental deletion, device lost or broken

Support all the latest iPhone, iPad and iPod Touch

Both Free and Pro version.

If you lost data after you updated to a new iPhone, you can always use Gihosoft iPhone Data Recovery to get the data back from the old iPhone or backup.You may also like: iphonerecovery.com

If you use android phones, please choose Gihosoft Android Data Recovery.

With Gihosoft Android Data Recovery, no longer afraid of data loss!

Gihosoft RePicvid Free Photo Recovery Software provides a free photo recovery software for windows to help users recover the deleted or lost photo for free.

Jihosoft Android Data Recovery: the best Android Data Recovery software for Windows and Mac to recover deleted contacts, messages, photos, videos, WhatsApp and etc from Android devices.

jihosoft Free iPhone Data Recovery


Worth reading:Best youtube downloader online download youtube 1080p

Sunday, June 10, 2018

How to downgrade iOS 11.4 to 11.3.1 firmware

WHY IS A DOWNGRADE TO IOS 11.3.1 NECESSARY?

As you already know, an iOS 11.3.1 jailbreak is in the works and will hopefully be released soon.
Downgrading or upgrading to iOS 11.3.1 will ensure your device will be on a compatible firmware.
If you somehow miss the signing window, you will not be able to run the jailbreak tool on your device. You can read more about this here.
Downgrade iOS 11.4 to 11.3.1
Remember, do not update if your device is already on iOS 11.1.2 or below.
Although a jailbreak release is imminent, nothing has been released thus far. Therefore, it makes sense to stick with Electra jailbreak for the time being.
Just save your SHSH Blobs with TSS Saver tweak and wait for the jailbreak.

REQUIREMENTS

  • iPhone, iPad, or iPod touch
  • iOS 11.3.1 IPSW firmware file for your device
  • Windows or Mac
  • USB cable
  • Internet connection

DOWNGRADE (WITHOUT LOSING DATA)

An upgrade or downgrade is the way to go if you are on iOS 11.2-11.3 or 11.4. This method will ensure your data stays
Step 1 Download the IPSW firmware file for your Apple device from here. If the downloaded file has ZIP format, rename its extension to IPSW.
Step 2 Connect your device to your computer.
Step 3 Open iTunes and ensure it detects your device. Select your device from the top-left corner.
Step 4 Go to Summary.
iTunes
Step 5 Press Shift key (Windows) or Alt key (Mac) and click on Update.
Step 6 Select the iOS 11.3.1 IPSW file you downloaded in step 1 in the popup window.
Step 7 iTunes will now verify the firmware file and ensure it is signed before it updates your device. Once it does, allow it to extract the iOS version.
Step 8 Wait until your iPhone or iPad restarts.

RESTORE (DATA WILL BE LOST)

A clean restore is recommended if you are on iOS 11.1.2 or older versions and want to go to iOS 11.3.1. A fresh restore will ensure proper compatibility with the upcoming tool.
However, a restore will also wipe your device clean so perform a full iTunes backup beforehand.
Step 1 Download the IPSW firmware file for your Apple device from here. Again, don’t forget to rename its extension to IPSW if your computer treats it as an archive.
Step 2 Put your iPhone or iPad in DFU mode.
  • Press and hold the Home button if you own an iPhone 6s or older device.
iphone 6 recovery mode
  • In the case of iPhone 7/7+, press and hold the Volume Down button.
iphone 7 dfu mode
  • For iPhone X, hold both volume up and volume down buttons along with the sleep/wake button.
Step 3 Connect your device to your computer and select it from iTunes.
Step 4 iTunes will now notify you that your iPhone/iPad has been detected.
itunesdetected
Step 5 Press Shift key (Windows) or Alt key (Mac) and click on Restore.
Step 6 Select the IPSW file you downloaded in step 1 to start the restore process.
Step 7 Wait for iTunes to verify the firmware and update your device. It usually takes no more than 5-10 minutes.
Step 8 Once the restore finishes, follow on-screen instructions to set up your device.
If you want a video tutorial, check this video out.
I just downgraded my iPad Pro to iOS 11.3.1 and saved my SHSH Blobs for my iPhone. If you haven’t already done that, make it quick.
Do you like this story?
Sponsor Ads:
Gihosoft iPhone Data Recovery is a professional iPhone Data Recovery software to get back all your lost text message, photo, video, call history, note, contact and more from iPhone/iPad/iPod Touch. It offers a full solution to recover your lost data in different tough situations. Besides recovering data directly from iPhone, iPad and iPod touch, it also allows you to recover data from iCloud and iTunes backup files.